How to configure our MD3 stepper motor driver via a PC
Our MD3 stepper motor driver can drive size 14 to 42 stepper motors from full stepping up to 256 microsteps per step. In this blog post we’re going to walk you through how to set up the MD3 and configure it using a Windows PC.
If you prefer to learn with visuals, we also created a video that goes into the basics, which is available below:
Step 1: Connect your MD3 to a stepper motor, power and an encoder.
The J3 connector, which can be seen at the lower left of the MD3 (when looking at it from the top) is used to connect to a stepper motor.
The J2 connectors on the other side are used the connect to an encoder and power. You can use pins 6 and 1 of the J2 to provide isolated power if noise is an issue, or you can use jumper wires with a single power supply (see photo below.)
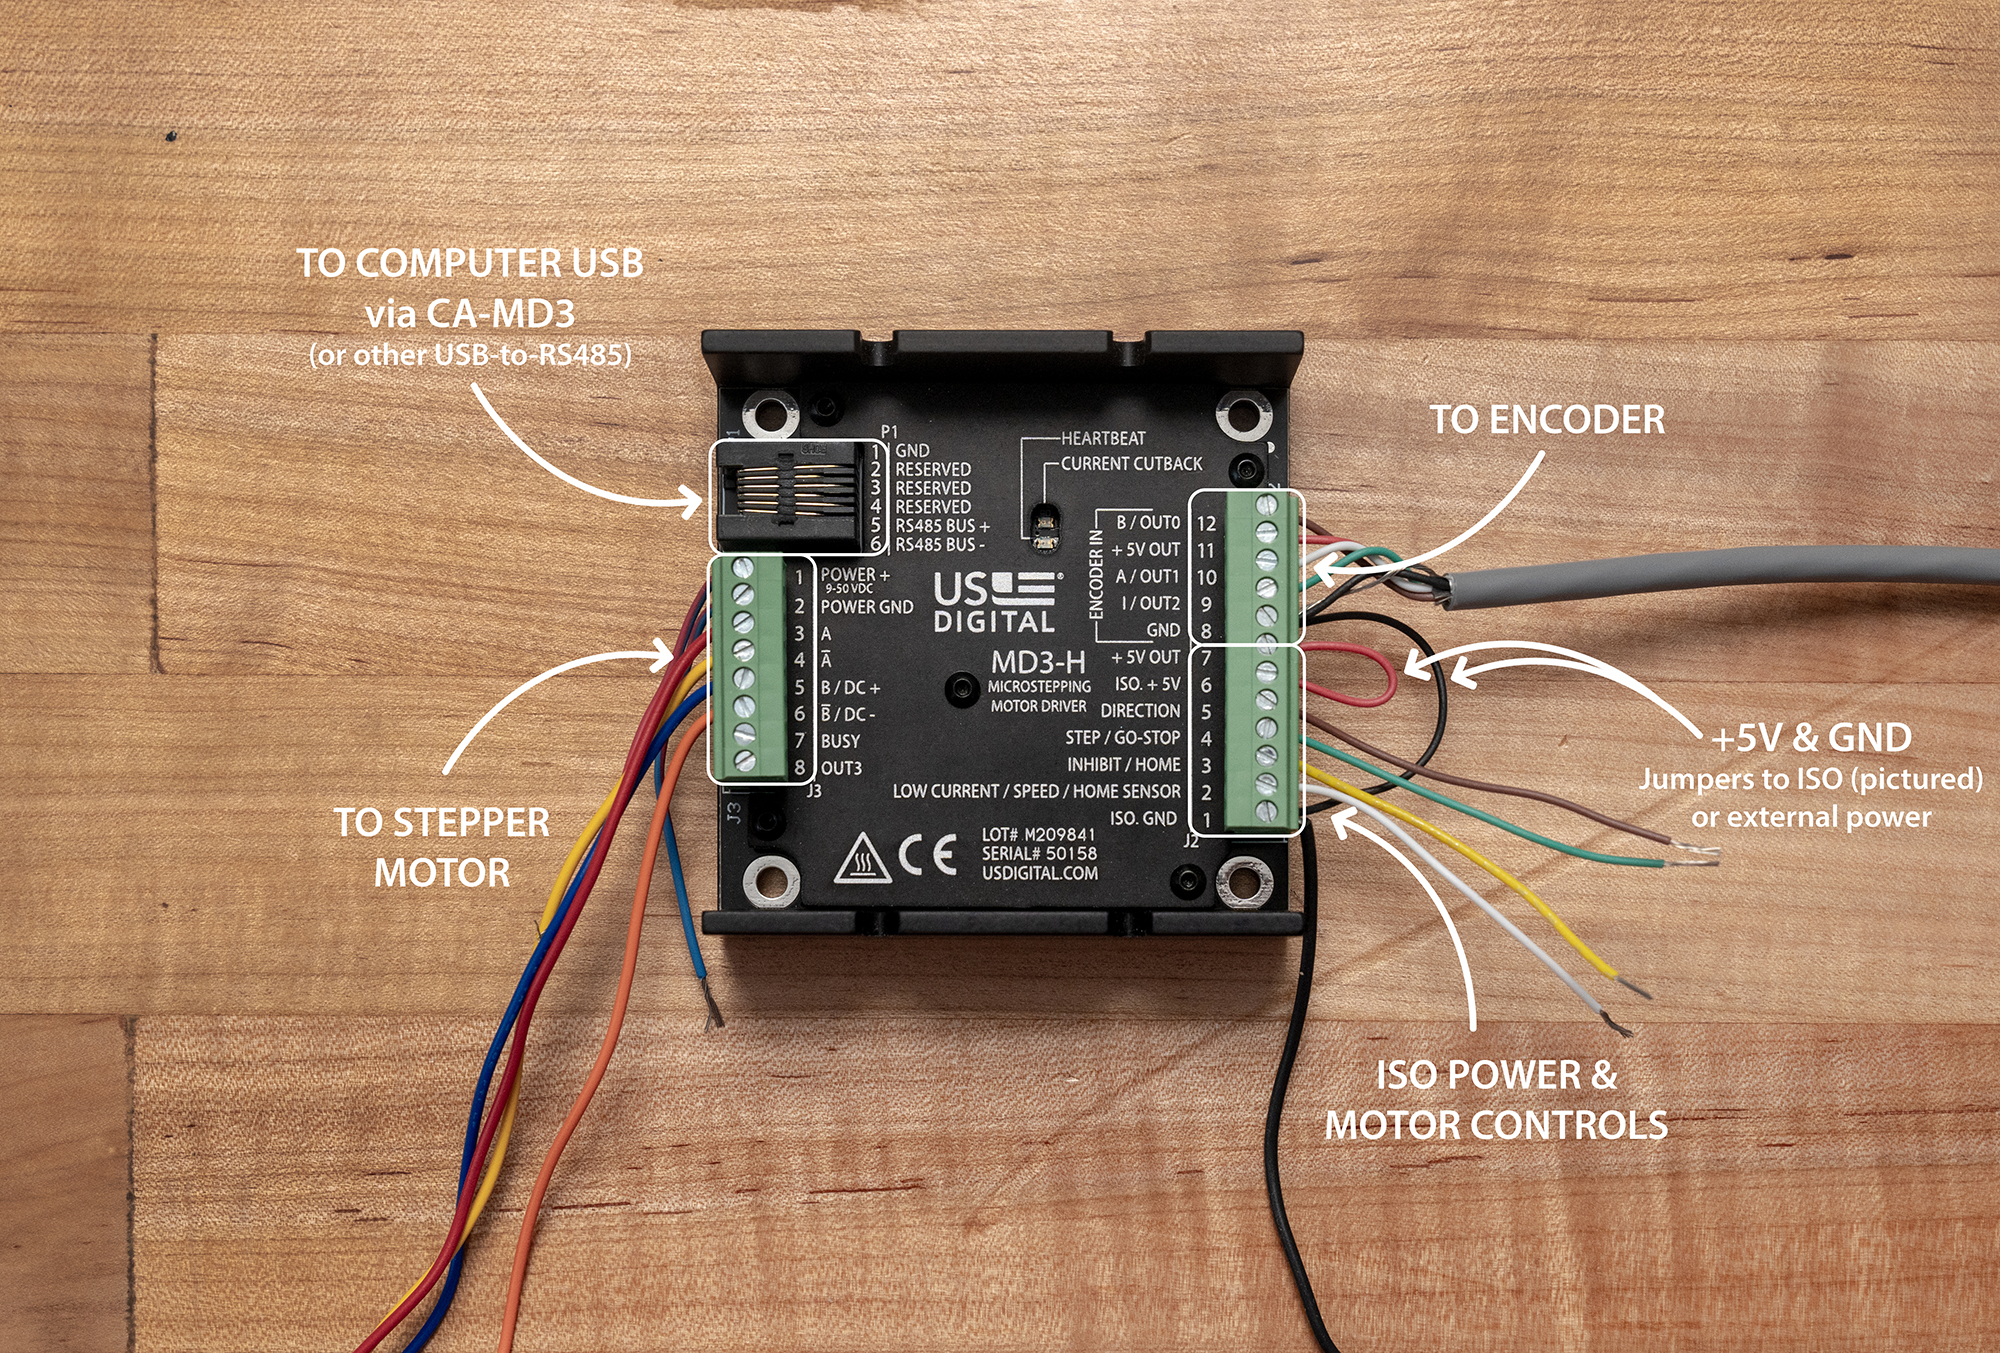
For further instructions on wiring, please refer to our MD3 user guide, which details what is connected to each pin.
Before we continue, a few words of warning: Do not connect or disconnect the motor leads when the MD3 is powered. Make sure that all connections are made and J3 is plugged in before applying the main power. Do not unplug J3 when the drive is powered. Failure to follow these instructions may damage the drive.
Once you have made your J2 and J3 connections, you can turn on the power supply.
Step 2: Connect the MD3 to a Windows computer
The P1 port on the top left of the MD3 is used to connect an RS485 adapter such as our CA-MD3. Connect the MD3 to your computer’s USB port.
Step 3: Install and run the software
The latest MD3 software can be found on our support tab. Download and install the software. Once installed, you’ll see there are two applications: MD3 Setup and MD3 Demo. The MD3 Setup application makes the MD3 function like our discontinued MD2S. We’re going to ignore that for now and look at the MD3 Demo software.
Software overview
Once in the MD3 Demo software, use the "COM Port" pulldown to choose the PC COM port the RS485 adapter is using and click on "Connect." The program will scan and connect to the MD3.
From here there are multiple tabs that give you control of the MD3 functions.
Motion Control: The motion control tab gives you control over speed, acceleration, steps to move, power settings and encoder configuration. There also are quick motion commands we programmed into the software. You can also configure how you want the J2 pins to work on the MD3.
Communication: The communication tab can be used to configure the baud rate and some other communication parameters. This is particularly useful if you’re using your own software or hooking the MD3 up to an existing system.
Registers: This tab is used to read or write directly to the MD3 registers.
Activity Log: This tab logs Modbus serial commands and replies exchanged between the MD3 and host PC. You can also monitor errors here if the “error log” box is checked.
Maintenance: The maintenance tab can be used to check for and install firmware updates for the MD3 or rest the device if you want to go back to the previous settings saved in EEPROM.
Please note, any changes you make in the software will modify the internal RAM registers of the MD3 and take effect immediately, but they will not be saved to non-volatile EEPROM on the MD3 until the "Save Configuration to EEPROM" button is pressed.
If the current configuration is not wanted, the unit can be power cycled to reload the previous settings from EEPROM or you can click the "reset device" button on the maintenance tab.
That should be enough to get you started with the MD3. If you want to go into greater detail, please refer to the user guide. If you have any questions, don’t hesitate to reach out to us. We’d love to help answer any questions we can.
More in News
Stay up to date
Sign up for our newsletter to stay up to date with our product updates, blog posts, videos and white papers.